Quickstart AWS Lambda Deployment
Before you begin
- You have read the AWS Lambda Deployment Overview.
- AWS requirements:
- You need an AWS Account, and you must have authority to create an IAM Role.
- You should be familiar with AWS Lambda.
- You need an AWS Lambda execution role.
Learning objectives
In this guide, you deploy an AWS Lambda function to four regions in your AWS Lambda account.
- Sign up for CD-as-a-Service.
- Install the CD-as-as-Service CLI on your Mac, Linux, or Windows workstation.
- Create AWS artifacts
- Create the IAM Role that CD-as-a-Service assumes to deploy your function.
- Create S3 buckets, one for each deployment region, to house your function’s zip files.
- Upload the sample function to each S3 bucket.
- Create your CD-as-a-Service deployment config file.
- Deploy the sample function.
- Test the deployed function in the AWS Lambda console.
Sign up for CD-as-a-Service
Access the registration screen to create an account. Fill in the required fields. When you’re done, click Create Account.
When you create your account, CD-as-a-Service does the following:
- Creates an Organization for your company
- Creates a Tenant for the Organization
- Creates a User account with an Organization Admin role for you.
See Identity & Access Management for details.
You may have to log in after creating your account.
The Welcome to Continuous Deployment-as-a-Service Configuration page lists the steps you need to complete to begin using Armory CD-as-a-Service.
Install the CD-as-as-Service CLI
brew tap armory-io/armory
brew install armory-cli
You can install the CLI with a one-line script that does the following:
- Fetches the correct Armory Version Manager binary (
avm) for your operating system - Installs the AVM binary
- Uses the AVM to install the CLI binary (
armory) - Adds the AVM and the CLI to the path in your bash or zsh profile
Execute the following script on the machine that has access to your Kubernetes cluster:
curl -sL go.armory.io/get-cli | bash
After installation completes, you should start a new terminal session or source your profile.
Download the AVM for your operating system and CPU architecture. You can manually download it from the repo or use the following command:
curl -LO https://github.com/armory/avm/releases/latest/download/avm-<os>-<architecture>For example, the following command downloads the latest version for macOS (Darwin):
curl -LO https://github.com/armory/avm/releases/latest/download/avm-darwin-amd64You can see the full list of available releases in the repo.
Note: You can also download AVM from the releases AWS S3 bucket:
curl -LO https://armory-cli-releases.s3.us-west-2.amazonaws.com/avm/latest/avm-darwin-amd64Give AVM execute permissions. For example (on macOS):
chmod +x avm-darwin-amd64Confirm that
/usr/local/binis on yourPATH:echo $PATHThe command returns your
PATH, which should now include/usr/local/bin/.Rename the AVM binary to
avmand move it to/usr/local/bin, which is on yourPATH. For example (on macOS):mv avm-darwin-amd64 /usr/local/bin/avmRun the following command to install the CLI:
avm installThe command installs the CLI and returns a directory that you need to add to your path, such as
/Users/milton/.avm/bin.If you get an
developer cannot be identified errorwhen trying to run AVM, you must allow AVM to run.Show me how to allow AVM to run.
On macOS, go to System Preferences > Security & Privacy > General and click Allow Anyway.
For more information, see the macOS documentation about how to open a Mac app from an unidentified developer.
Add the directory that AVM returned when you ran
avm installto your path.Show me how to add the directory.
You can either add the path directly to
/etc/pathsor add it to your shell profile. The following steps describe how to add it to your shell profile:Edit the resource file for your shell, such as
.bashrc,.bash_profile, or .zshrc. For example:vi ~/.bashrcIn the file, find the line for the
PATHthat your resource file exports. They follow the formatexport PATH=$HOME/bin:/usr/local/bin:$PATH.Insert the path provided by AVM (such as
/Users/brianle/.avm/bin) before the ending$PATH. The line should look similar to this:export PATH=$HOME/bin:/usr/local/bin::/Users/milton/.avm/bin:$PATHSave the file.
Reload your terminal, open a new session, or
sourceyour terminal profile file (for example,source .bash_profile).
Run the following command to verify that the CLI is installed:
armoryThe command returns basic information about the CLI, including available commands.
For the AVM or the CLI, you can use the -h flag for more information about specific commands.
Armory provides the CD-as-a-Service CLI as a Docker image.
docker pull armory/armory-cli
Download the latest armory-cli Windows executable from the repo Releases page. Install on the machine that has access to your Kubernetes cluster.
Log in with the CLI
armory login
Confirm the device code in your browser when prompted. Then return to this guide.
Create the Armory IAM role
In order to deploy AWS resources, CD-as-a-Service needs to create a Trust Relationship in your AWS account by adding an IAM role. CD-as-a-Service assumes this role to execute deployments on your behalf. The Armory CLI provides a function that creates an AWS CloudFormation Stack with an IAM Role, by default named ArmoryRole. You need to create a Stack in each AWS Account you want to deploy your AWS Lambda functions to.
In your default browser, log in to your AWS Account. You must have permissions to configure IAM roles.
In your terminal, execute the following:
armory aws create-roleType
Yin the terminal to continue with Stack creation. This opens your browser to the CloudFormation page of your AWS Console. You complete the rest of this process in your browser.Review the resources that CD-as-a-Service is creating in your AWS account. The default IAM Role name is ArmoryRole.
Click Create on the AWS CloudFormation page and wait for Stack creation to finish.
After the CloudFormation Stack creation finishes, locate the created role ARN in the Outputs section. You can find it under the key RoleArnOutput. Make note of the ARN since you use it in your deployment config file.
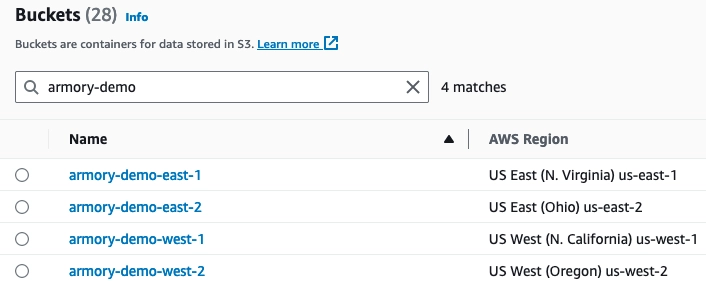
Create S3 buckets
You need to store your AWS Lambda function as a zip file in an S3 bucket, and S3 bucket needs to be in the same region you deploy to. For this guide, you are going to deploy the AWS Lambda function to four regions so you need to create four buckets:
| Region | Bucket Name |
|---|---|
| us-east-1 | armory-demo-east-1 |
| us-east-2 | armory-demo-east-2 |
| us-west-1 | armory-demo-west-1 |
| us-west-2 | armory-demo-west-2 |
Use the default values for the rest of the fields.
After you have finished, you should have four buckets.
Upload the AWS Lambda function to your buckets
Armory provides a basic AWS Lambda function called just-sweet-potatoes for you to deploy.
Expand to see the code
index.js has the following content:
exports.handler = async (event) => {

  const randomFact = potatolessFacts[Math.floor(Math.random() * potatolessFacts.length)];

  // Prepare the response
  const response = {
    statusCode: 200,
    body: randomFact,
  };

  return response;
};

const potatolessFacts = [
    "Sweet potatoes are a great source of vitamin A, which is important for vision health.",
    "There are over 400 varieties of sweet potatoes around the world.",
    "Sweet potatoes are not related to regular potatoes; they belong to the morning glory family.",
    "Sweet potatoes are high in fiber, making them good for digestion.",
    "Sweet potatoes come in different colors, including orange, purple, and white.",
    "Sweet potatoes are one of the oldest vegetables known to man.",
    "North Carolina is the largest producer of sweet potatoes in the United States.",
    "Sweet potatoes are often used in Thanksgiving dishes like casseroles and pies.",
  ];
- Download the function zip file.
- Upload the file to each of your
armory-demo-lambda-deployS3 buckets. - Make a note of each bucket’s S3 path to the lambda function. The paths should be:
s3://armory-demo-east-1/just-sweet-potatoes.zips3://armory-demo-east-2/just-sweet-potatoes.zips3://armory-demo-west-1/just-sweet-potatoes.zips3://armory-demo-west-2/just-sweet-potatoes.zip
Create your deployment config file
First create a file called deploy.yaml with the following contents:
| |
kind:lambdatells CD-as-a-Service the deployment typeapplication: This is the unique name of your deployment and appears in the Deployments list.description: Brief description of your function (optional)
Add a canary strategy
A strategy defines how CD-as-a-Service deploys your AWS Lambda function to a target.
A canary strategy is a linear sequence of steps. The setWeight step defines the ratio of traffic between function versions.
Add a basic canary strategy with a single step that sets the weight to 100. This routes 100% of traffic to the new version. You use this allAtOnce strategy to initially deploy your function to AWS Lambda when the function does not exist in the AWS Lambda console. This strategy is also useful in non-production environments such as staging.
| |
Add targets
In CD-as-a-Service, a target is an (AWS Account, region) pair.
flowchart LR
    A[dev] --> B[staging]
    B --> C[prod-west-1]
    B --> D[prod-west-2]
When deploying to multiple targets, you can specify dependencies between targets using the constraints.dependsOn field. CD-as-a-Service deploys your AWS Lambda function from your S3 bucket to the dev target first. You want a linear, success-dependent progression from dev to prod, so there is a dependsOn constraint for staging and prod targets. staging depends on dev and the prod targets depend on staging.
Add the four targets, one in each region:
| |
Replace:
<account-name>with the name of your AWS Account, such asarmory-docs-dev<armory-role-arn>with the ARN of the role you created in the Create the Armory IAM role section
Add AWS Lambda artifacts
In this section, you declare your AWS Lambda function artifacts. You have an entry for each deployment region.
The function is named just-sweet-potatoes in each S3 bucket, but the functionName is unique for each entry in the
artifacts collection. For this guide, the target name is appended to the function’s name to create the
functionName value for each entry.
| |
Add provider options
This section defines options specific to the cloud provider to which you are deploying. You need to populate provider options for each deployment target.
| |
target: CD-as-a-Service deployment target namename: This is the same value asartifacts.functionNameandtrafficManagement.alias.functionNamefor the target region. This function name appears on your AWS Lambda Functions list page.runAsIamRole: Replace<execution-role-arn>with the ARN of your AWS Lambda execution role, which is not the ArmoryRole ARN.handler: The function’s handler method, such asindex.handler. This value is written to the Runtime settings section in the AWS Lambda function details page.runtime: runtime identifier, such aspython3.22ornodejs18.x. This value is written to the Runtime settings section in the AWS Lambda function details page.
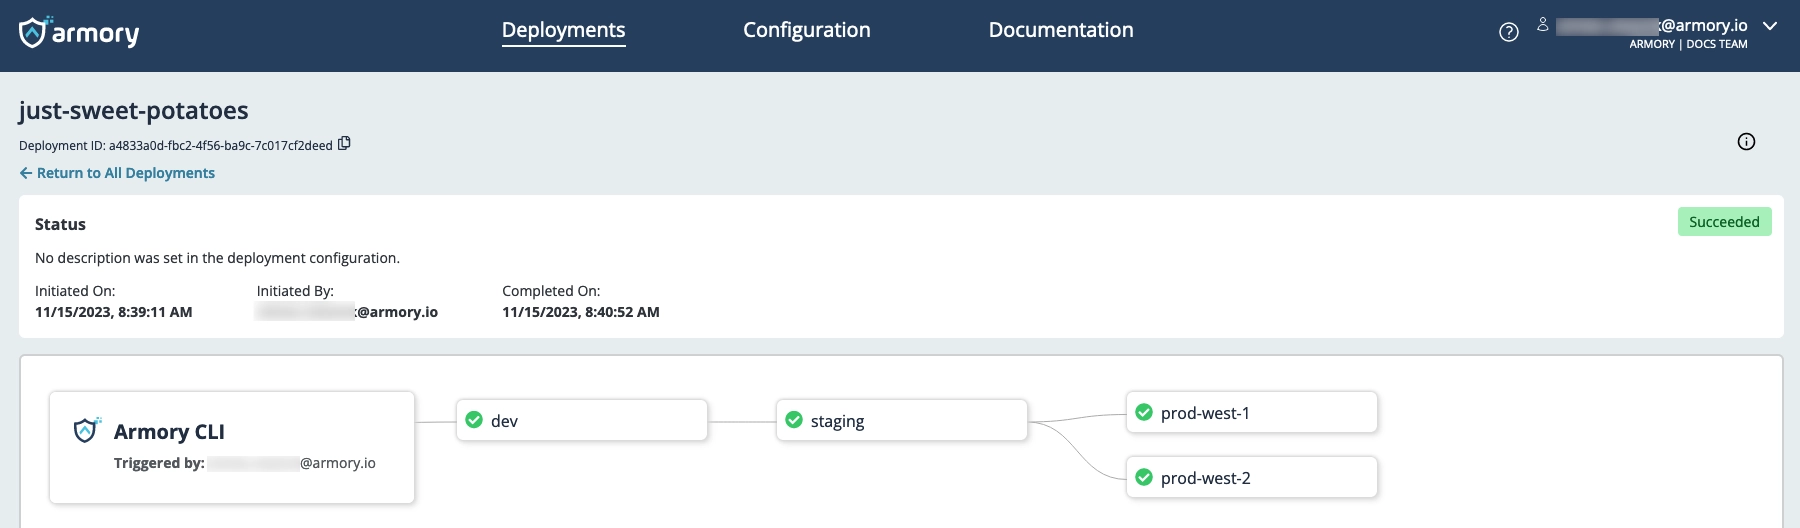
Deploy the sample function
First deployment
Start your deployment using the CLI:
armory deploy start -f deploy.yaml
You can use the link provided by the CLI to observe your deployment’s progression in the CD-as-a-Service Console. CD-as-a-Service deploys your resources to dev. Once those resources have deployed successfully, CD-as-a-Service deploys to staging and then prod.
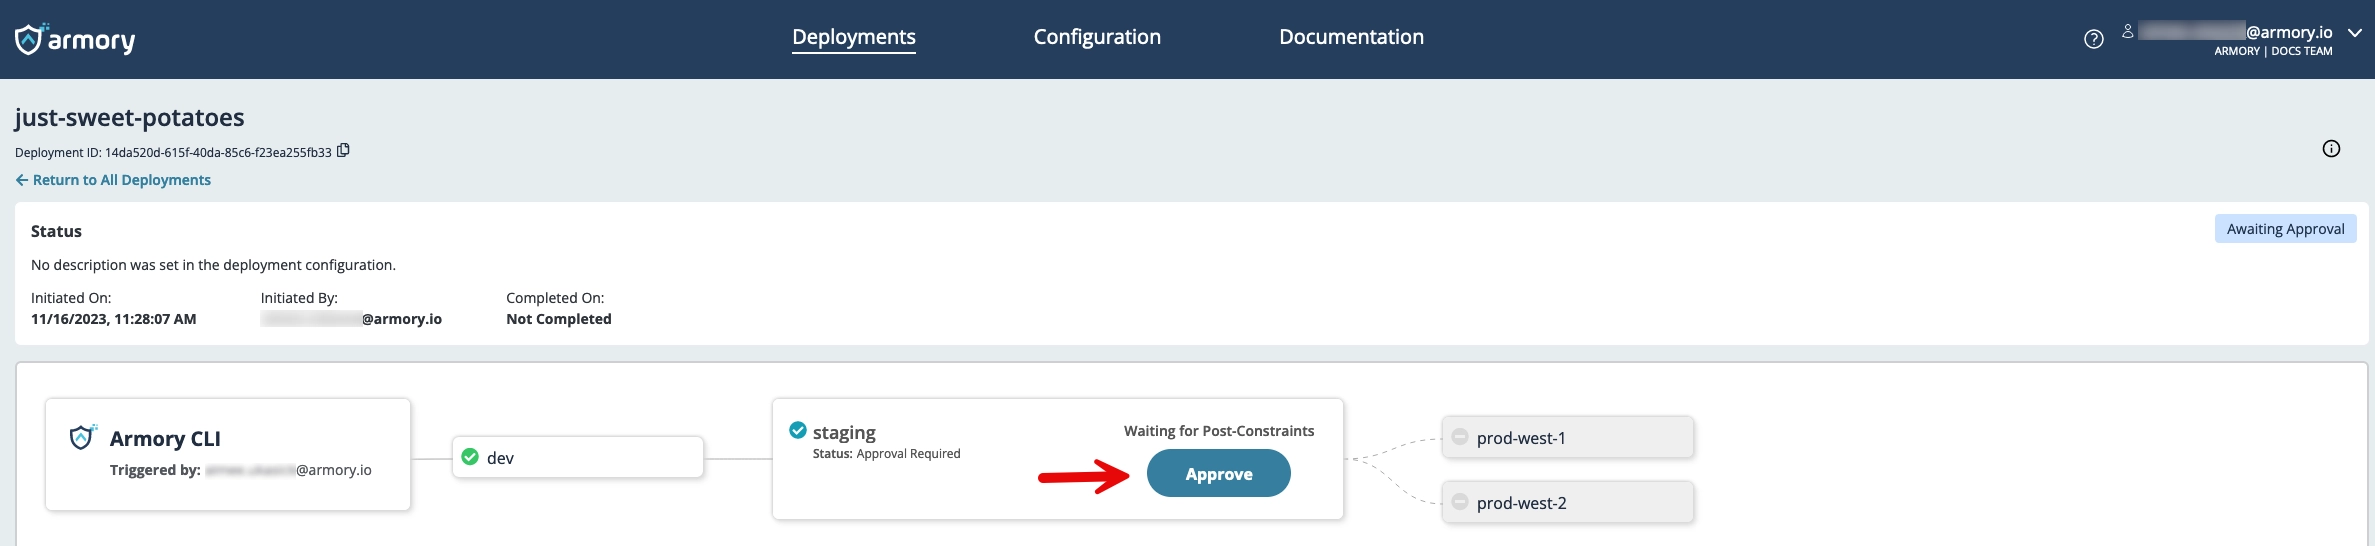
Second deployment
CD-as-a-Service is designed to help you build safety into your app deployment process. It does so by giving you declarative levers to control the scope of your deployment.
CD-as-a-Service has four kinds of constraints that you can use to control your deployment:
- Manual Approvals
- Timed Pauses
- External Automation (Webhooks) to run integration tests and security audits or send notifications
- Automated Canary Analysis
You can use these constraints between environments and within environments. During your next deployment, you want to issue a manual approval before deploying to to the prod targets. Add to your staging target an afterDeployment constraint with a manual judgment:
| |
Start your second deployment using the CLI:
armory deploy start -f deploy.yaml
Use the link provided by the CLI to observe your deployment’s progression in the CD-as-a-Service Console.
In this second deployment, you see that CD-as-a-Service paused deployment to prod. Click the Approve button in the staging node to continue deployment.
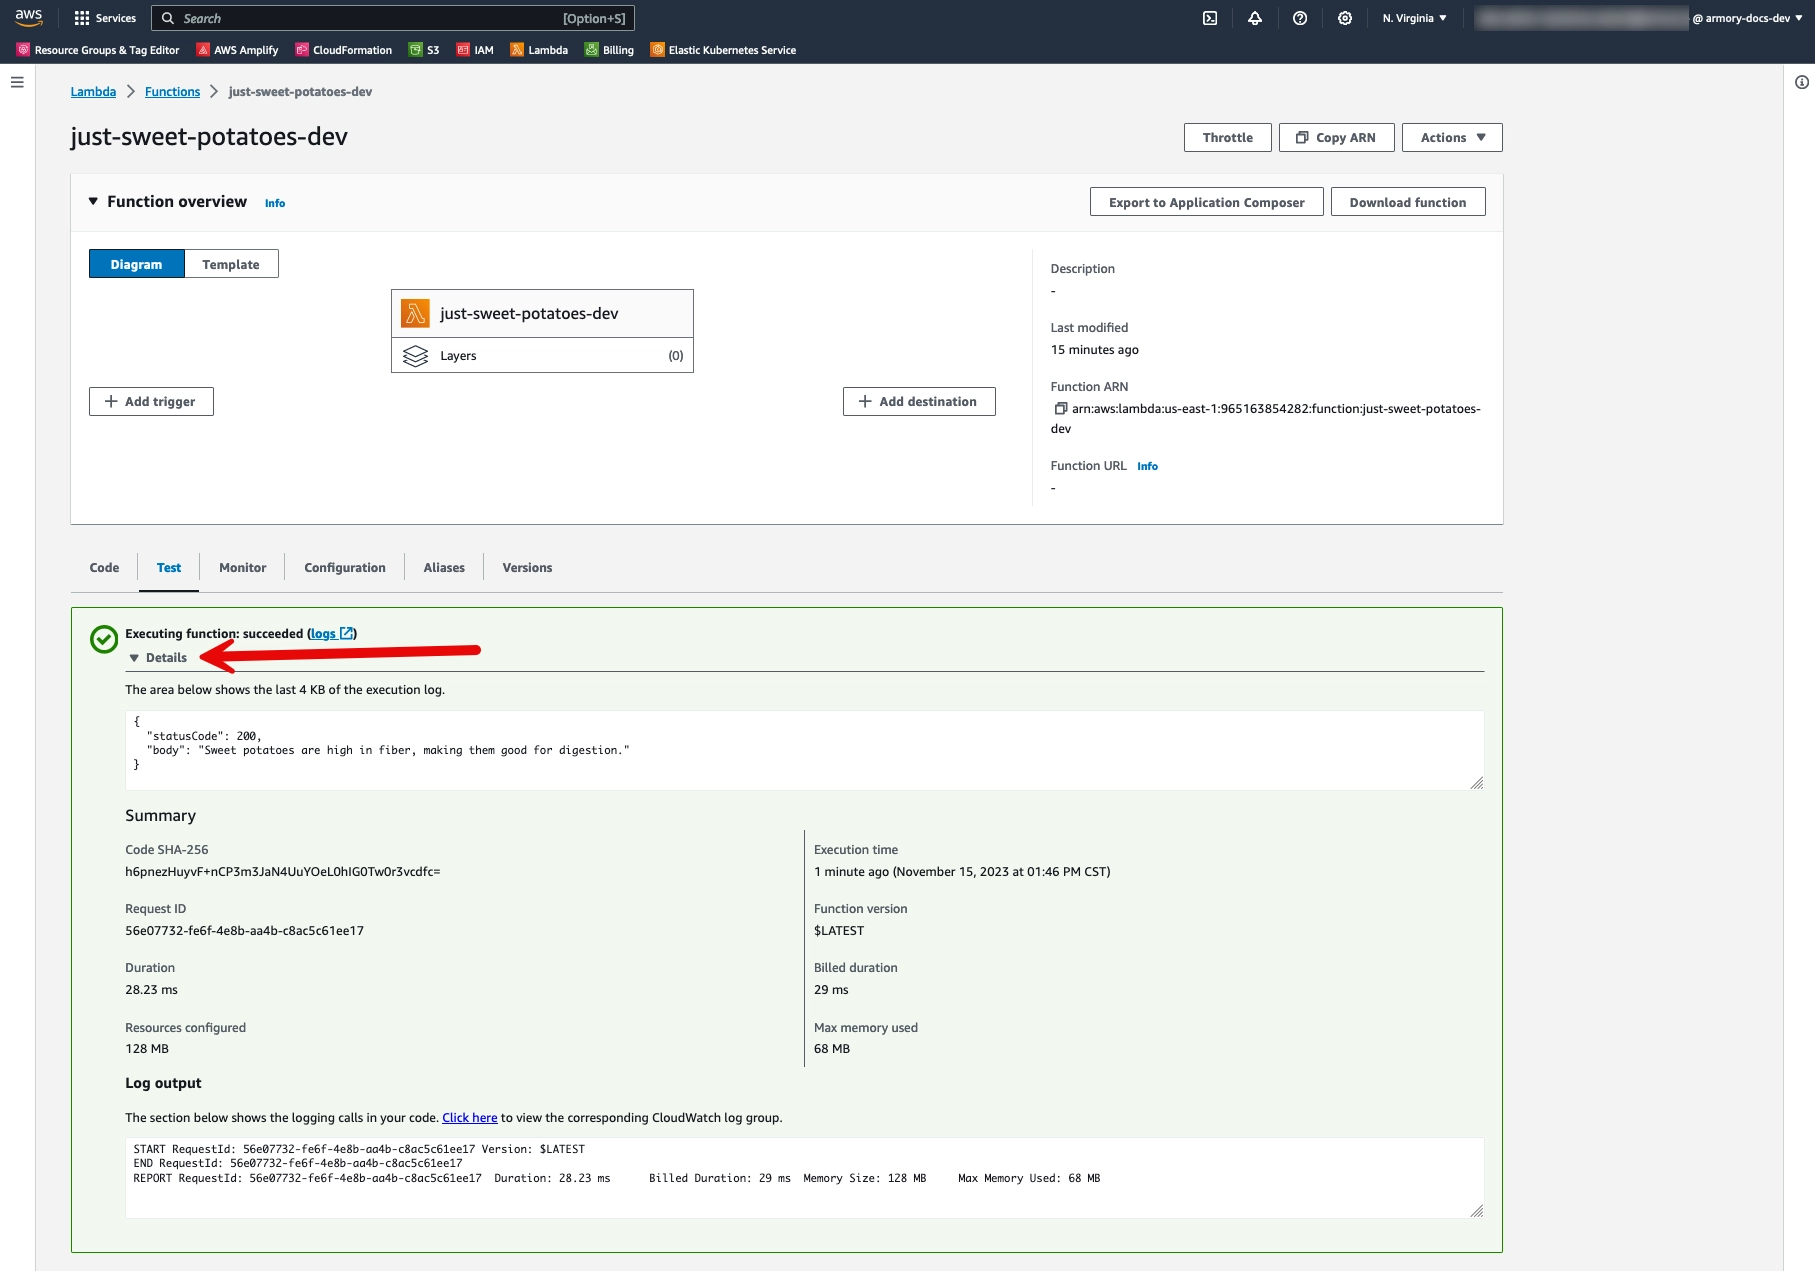
Test the deployed function
Go to the us-east-1 Lamba section of your AWS Account. You should see your deployed just-sweet-potatoes-dev function there.

Click
just-sweet-potatoes-devto open the function’s details page.Click the Test tab.
Click the Test button in the Test event section to test the function.
Expand the Details section to see the test results.
Clean up
- Delete the deployed AWS Lambda functions from each region.
- Delete the AWS Lambda zip files from each S3 bucket. Delete each S3 bucket.
- Delete the CloudFormation Stack. This also deletes the associated IAM Role.
What’s next
- Use Armory's GitHub Action to Deploy Your App Using CD-as-a-Service
- Configure a Canary Deployment Strategy
- External Automation Approval Using Webhooks Overview
Feedback
Was this page helpful?
Thank you for letting us know!
Sorry to hear that. Please tell us how we can improve.
Last modified November 27, 2023: (803ecce)